The problem
Our current Software Development lifecycle at work is straightforward: We have a development, a staging, and a production environment. We use feature-branches and pull-request where developers review each other PR’s before it gets merged (and auto-deployed) into development. On development, it gets tested by test-team. And once approved, gets pull-requested and accepted to the staging environment, where business can test it as well before going to production.
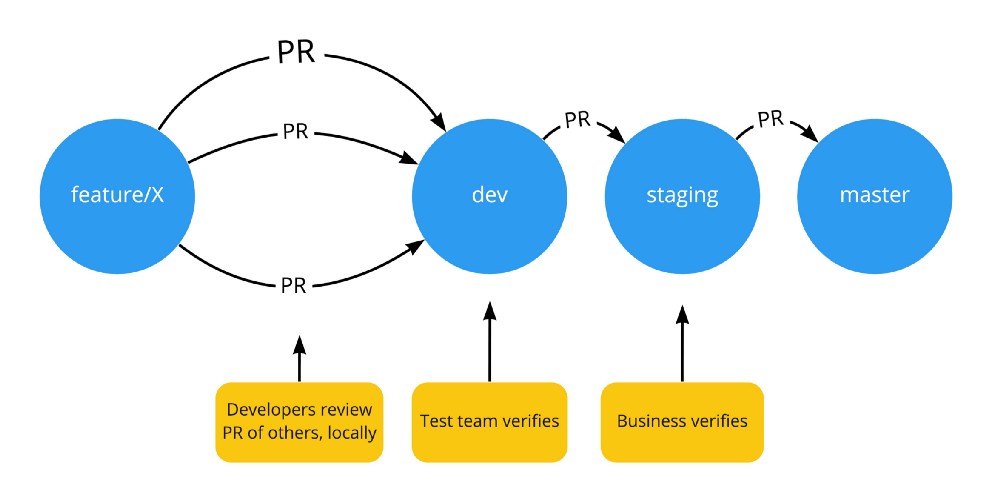
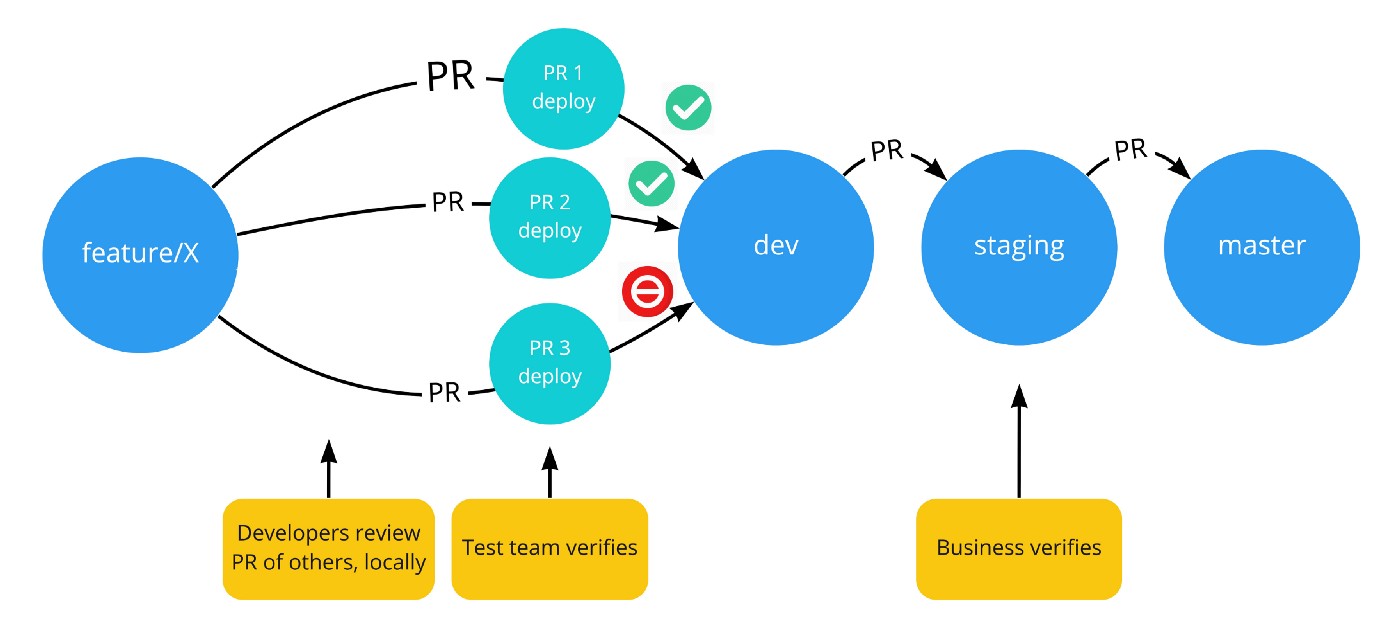
All is fine, except that if test-team disapproves a certain feature, then development is in a kind of blocked state, containing both features who have passed by test-team, together with features who are disapproved by test-team. We cannot decide that “feature A and B can go to staging now, but feature C cannot”, since all three features are already on a single branch (dev-branch).
We could try to use something like git cherry-pick but we rather not starting to mess with git branches. Besides, the underlying problem is that test-team should be able to test these features independent of each other. A more ideal solution would be to have separate deployment environments for feature-testing. And so the following idea emerged:
 )
)
The Objective
For provisioning environments for deploying PR’s, different options exists. Whatever option is chosen, it is important to follow the concept of cattle, not pets, resulting in that these environments should be easy to set up, and also easy to break down or replace. We chose to use Kubernetes for this situation.
Since we are already using Azure DevOps (formally know as Visual Studio Team Services — VSTS), this platform will connect the dots and give us centralised control over the processes. The plan can be summarised as follows:
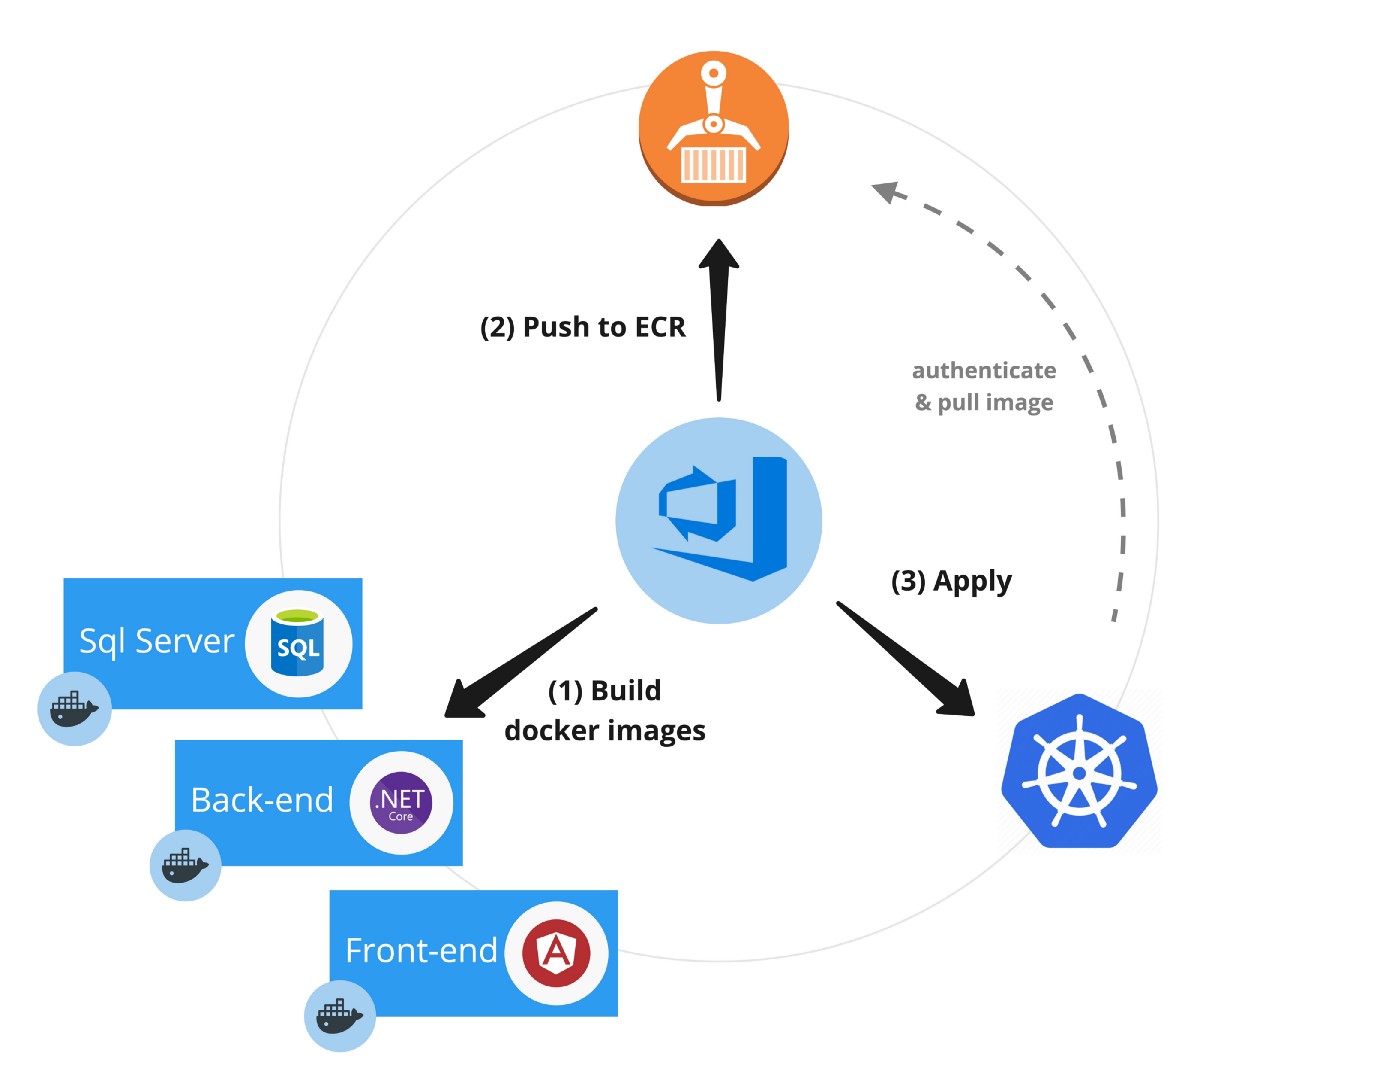
Dockerize it
The first step is dockerize your application components, so they can be easily deployed on a kubernetes cluster. Let’s take this straightforward tech stack as example: We have an angular front-end, a .NET Core back-end, and Sql Server as database. Since PR environments should be cattle, even the database is dockerized. This results in completely independent environments, where the database can be thrown away after testing is done.
Dockerize the back-end component
Probably the easiest of the 3 components. We have a .NET Core back-end. For this, we use a multi-stage dockerfile, so that the resulting image only contains the necessary binaries to run.
# First build step
FROM microsoft/dotnet:2.1-sdk AS build
WORKDIR /app
# config here...
RUN dotnet publish -c Release -o deploy -r linux-x64
# Second build step
FROM microsoft/dotnet:2.0-runtime-jessie AS runtime
WORKDIR /app
COPY --from=build <path/to/deploy/folder> ./
ENTRYPOINT ["dotnet", "Api.dll"]
Dockerize the front-end component (SPA)
A little bit more difficult, since Single Page Applications, like Angular, are mostly hosted as static content. This means some variables should be defined at build time, like an api-host for example. See this link for more information on how to configure this with docker builds. Knowing these variables in advance imposes some challenges as we will see below.
Dockerize Sql Server
Sql Server already has official docker images that you can use. However, what we would like to do, is make sure that every time a new environment is setup, the database is pre-populated with a dataset of our choice. This would allow us for more efficient testing. To achieve this, we can extend the current (sql-server) docker image with backups, and package the result as a new docker image! More details on how to achieve this can be found in this gist. Your dockerfile will look something like this:
FROM microsoft/mssql-server-linux
COPY . /usr/src/app
ENTRYPOINT [ "/bin/bash", "/usr/src/app/docker-entrypoint.sh" ]
CMD [ "/opt/mssql/bin/sqlservr", "--accept-eula" ]
If you don’t want any data pre-populated, you can use the official microsoft/mssql-server-linux image straight from DockerHub instead.
To make sure all docker containers play nicely together, you could use a docker-compose file to wire them all up and see if everything works locally, before trying things out in the cloud.
Create VSTS Build Pipelines
Once we got our docker images, we’ll want to push them to a container registry, like Elastic Container Registry (ECR) for example. Of course, we don’t want to push locally build docker images to ECR directly. We’ll want an automated build tool do this work for us instead! Lots of build tools exists today. Here, we’ll be showing how to do things with Azure DevOps / VSTS.
In VSTS, can you can implement your build processes in Build Pipelines and Release Pipelines. It’s perfectly possible to put everything in a Build Pipeline without using the Release Pipeline, but this split-up will give you some benefits that we’ll see later.
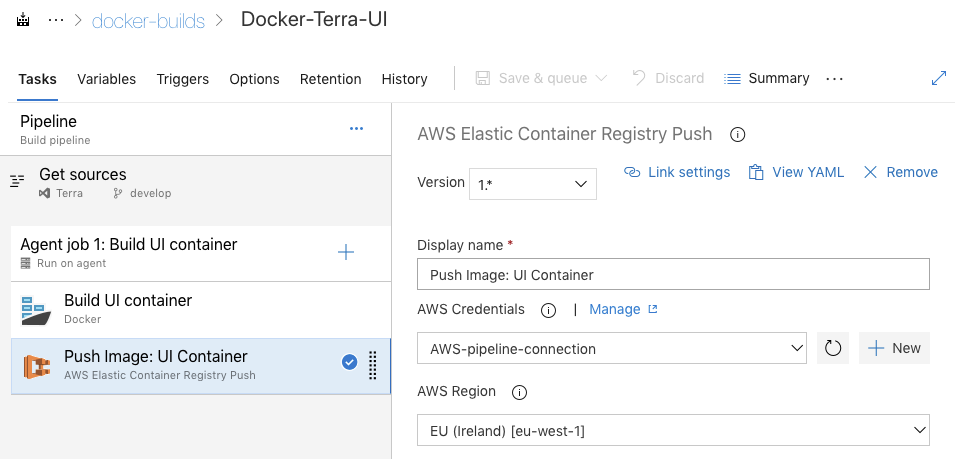
For step 1 (building docker images) and step 2 (pushing images to ECR), we’ll use a Build Pipeline. Below is an example of a setup for the UI docker image build pipeline. In VSTS, you have the option to choose between ‘click-and-drag’ kind of build process setup, or use the YAML based (infrastructure-as-code kind of) setup.
For each type of the docker image, we’ll create a separate Build Pipeline, so we can exploit parallel build processes when necessary.
Great! After all 3 build-pipelines for the 3 components are configured, we can start configuring triggers on when these builds are run.
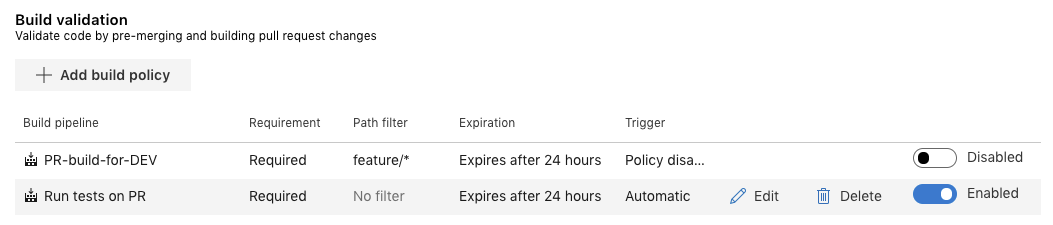
Configure triggers for Build Pipelines
Azure DevOps allows you to program very specific triggers, actions and gates. For triggering these Build Pipelines automatically, we can setup Branch Policies on a specific branch. In our case, on the development-branch.
Packaging kubernetes yaml configuration files
The output of Build pipelines can be turned into artifacts in Azure DevOps. These artifacts can then be used as input for Release pipelines as a next phase.
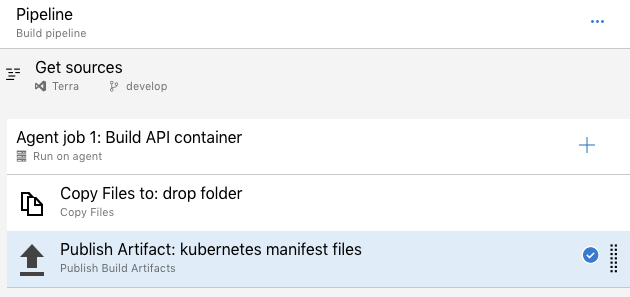
Because we’ll need the kubernetes yaml configuration files during the Release phase, we’ll need another Build pipeline which packages these files as an artifact. This Build pipeline will look something like this.
Create a VSTS Release Pipeline
Release Pipelines are used as a next phase. It uses the output produced by our Build Pipelines as input. Of course, the output of our docker build-pipelines are on ECR, not on Azure DevOps. The kubernetes yaml files are the only input used by the Release phase. The kubernetes cluster itself will pull the images straight from ECR when needed. (This sounds easier than done: EKS, AWS’s managed kubernetes solution, uses its own authorization mechanism, which does not play nicely with kubernetes own auth-mechanism. The solution consists of deploying a cronjob which will pull for new secrets once in a while, that will allow your cluster to be able to successfully authorize with ECR. This blogpost describes the solution in more detail).
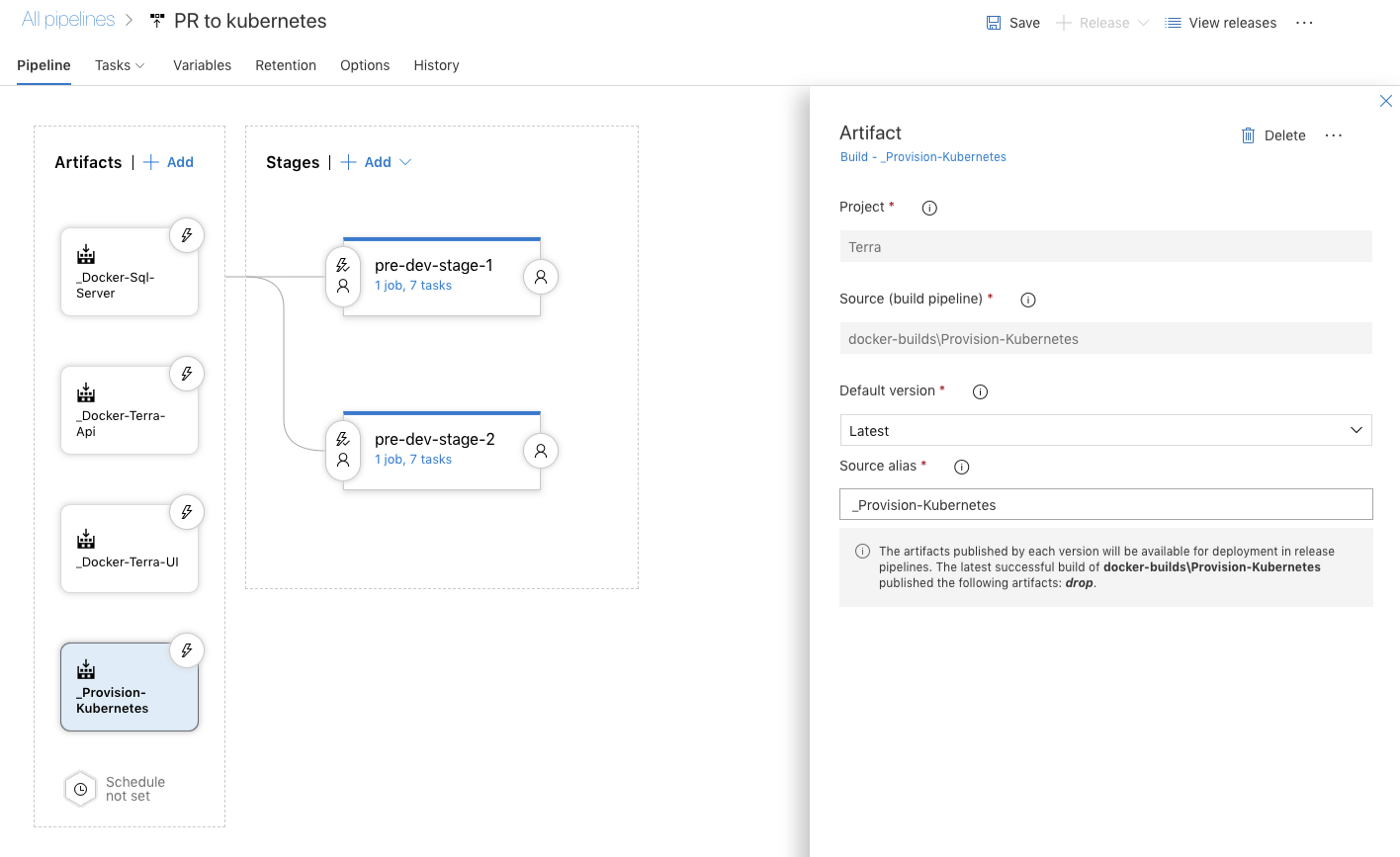
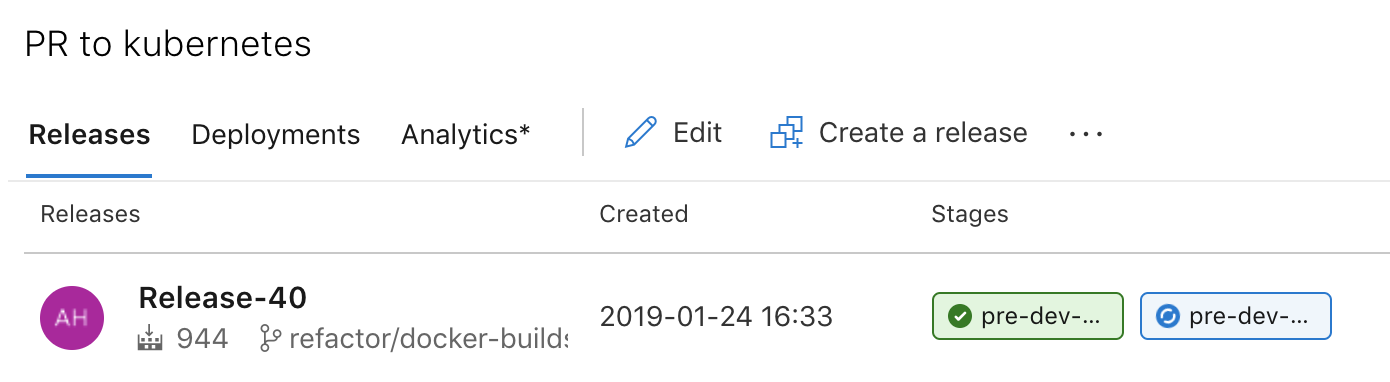
In a Release Pipeline, you can setup you release strategy with components called ‘Stages’. Inside these stages, you can define a number of jobs and tasks, just like in a Build Pipeline.
Take note of the names of the ‘Stages’ in this Release pipeline, given the names pre-dev-stage-1 and pre-dev-stage-2. These names can be dynamically retrieved in the tasks through parameters. The ‘stage’ name for example can be retrieved by using #{Release.EnvironmentName}# in expressions. We’ll use these values in 2 situations:
- As
namespaceswithin our kubernetes cluster - As part of a
dynamicdomain name
Apply kubernetes yaml file for specific namespace
It was this blogpost that helped me define setup everything in VSTS with kubernetes. By using the Release.EnvironmentName -parameter as namespace , you’re able to deploy complete new environments for each Stage you define. In our case for pre-dev-stage-1 and pre-dev-stage-2.
In this scenario, we’ll expose our 3 services via LoadBalancers. (Exposing the database here is not necessary, but helpful if we want to be able to directly connect a local client to the database for test-purposes).
$ kubectl get svc --namespace=pre-dev-stage-1
NAME            TYPE           CLUSTER-IP      EXTERNAL-IP
sql-server-01   LoadBalancer   10.100.23.456   xxx.elb.amazonaws.com
api             LoadBalancer   10.100.56.789   yyy.elb.amazonaws.com
ui              LoadBalancer   10.100.09.123   zzz.elb.amazonaws.com
Let’s look at what we have here: Each of these services has there own external-ip address which is great. However, remember from before that the UI is build as static sources, which are being hosted from within a container. We have no way to know upfront what the External-IP of the API service will be, which we will actually need upfront during docker build (because AWS will give these loadbalancers random names).
One way of solving this problem is using predefined domain names, so the UI can be build with such a predefined domain name. However, this gives us a new problem: Every time the ExternalIP changes, we need to modify DNS again and again to connect the ExternalIP of the Loadbalancer to the predefined domain we have chosen. Luckily, this problem can be solved thanks to ExternalDNS.
ExternalDNS and Cloudflare to the rescue
ExternalDNS is a tool that can be deployed within your kubernetes cluster. You can configure this service so it has direct access to your own DNS provider. In my case, I used Cloudflare, but this can be any DNS provider which is able to support ExternalDNS (see the list on github of supported DNS providers).
At regular intervals, it will scan your current config on specific tags which will tell the ExternalDNS service that it should update the DNS provider with the provided URI in the tag. For example, take a look at the following yaml configuration.
---
apiVersion: v1
kind: Service
metadata:
  creationTimestamp: null
  labels:
    app: myapp-api
  name: myapp-api
  annotations:
    external-dns.alpha.kubernetes.io/hostname: myapp-api-#{Release.EnvironmentName}#.example.com
    external-dns.alpha.kubernetes.io/ttl: "300" #optional
spec:
  type: LoadBalancer
  ports:
  - name: "80"
    port: 80
    targetPort: 2626
  selector:
    app: myapp-api
status:
  loadBalancer: {}
---
Be adding these extra annotation in my existing service, my external-dns service will be triggered to update my DNS (in this case Cloudflare) to match the correct LoadBalancer. Great! Fully automated! And yes, it will also clean up your DNS entries afterwards if these services are removed again from the cluster.
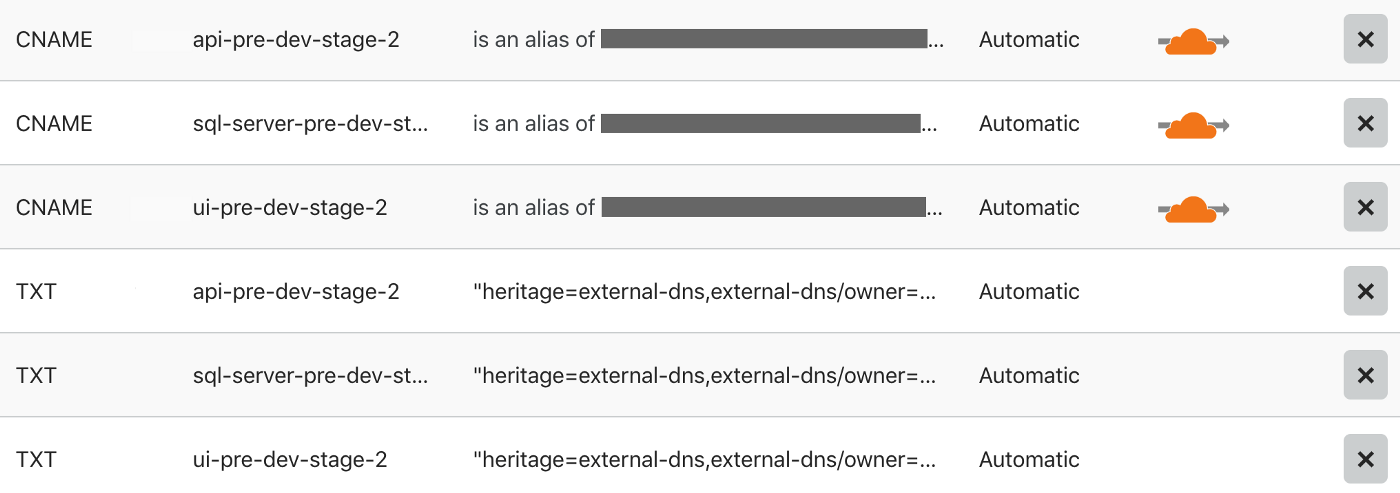
Important note: DNS updates can be quite slow, so depending on a range of many factors, this could take a while to propagate… or not.
Conclusion
With this setup, we can deploy manually or semi-automatic test environments from within Azure DevOps!
Thanks for reading. Cheers.
Last modified on 2019-01-23