In Today’s World, there are so much databases that we need a database to store an overview of databases. So let’s cross one of the list, and talk about AWS Neptune.
In short, AWS Neptune is the managed graph database solution in the AWS ecosystem. As such, it’s not cheap to run, but bear with me and I’ll show you the good stuff.
So, what is it?
Let’s throw some keywords around first. Graph databases are broadly seen as a branch of the NoSQL database category. They are generally a good fit for highly related data (think: social networks, covid-19 contact tracing, … you know the stuff). Maybe the best known graph database out there is Neo4j, which launched in 2007 and is one of the “older” ones. AWS, arriving a little late at the party, launched their managed graph database 10 years later, in 2017. Even though they are both handling graph data, there are some significant differences between these two. While Neo4j can be run anywhere, Neptune can only run in a VPC inside AWS. Or Neo4j uses it’s own developed query language called Cypher, while Neptune speeks the more industry accepted query languages like SPARQL and (Apache TinkerPop) Gremlin. (EDIT 01/2022: Since July 2021, AWS Neptune added support for the openCypher query language) Point is, if you’re looking for a graph database, make sure to do your homework and pick the one that fits your needs best.
Hands on!
Great, so you have chosen AWS Neptune as your graph database! Before you start developing, I must warn you that setting up a local development environment which can connect to Neptune is rather tricky and poorly documented by AWS. Hence this post, to get you up and running quickly without banging your head against the wall out of pure frustration.
The easy parts
Head over to the Neptune Service inside the AWS console and start clicking yourself a database together. The ‘cheapest’ option is to select the db.t3.medium instance for your DB Instance size. Take note that you’ll have to select a VPC to deploy your Neptune cluster in. This is mandatory and will complicate your local development setup, explained further below. You’ll end up with a cluster containing 1 instance (read-write) and you’re able to add read-replicas on demand. There is no auto-scaling currently. Be sure to turn this off when you’re done! Otherwise, you’ll be set back a couple of 100$ a month.

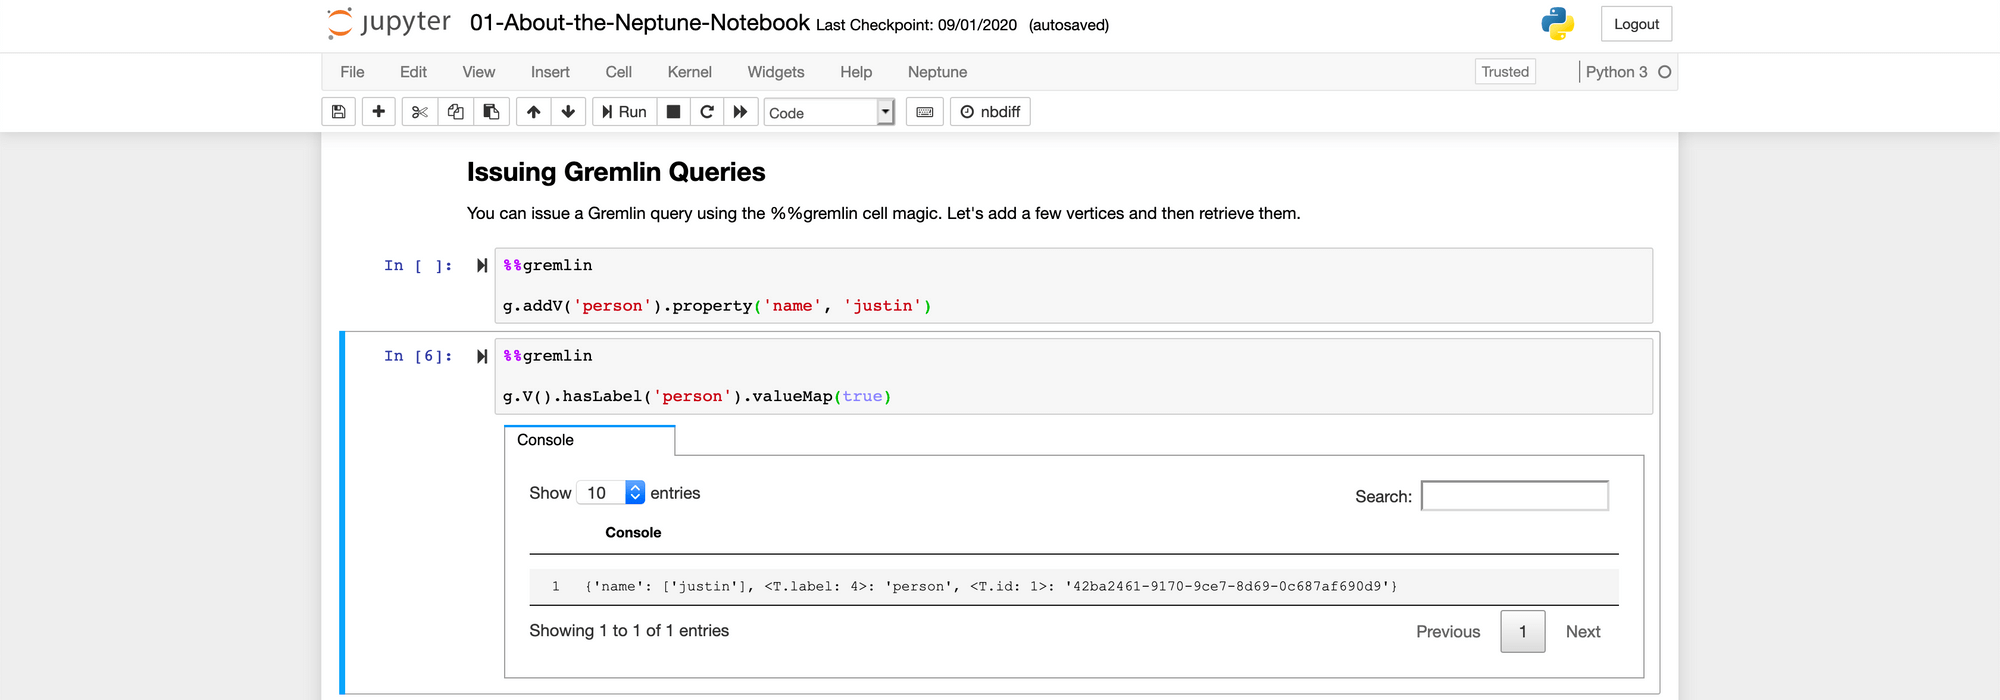
The simplest way to query your Neptune database, is by using a (Jupyter) Notebook (which is build on top of there AWS SageMaker service). By using the Notebooks link in the side-menu in the screenshot above, you can create or select a notebook that’s connected to 1 database cluster. When opening a new notebook, you’ll get some starter templates you can use for getting to know the different query options inside these notebooks.
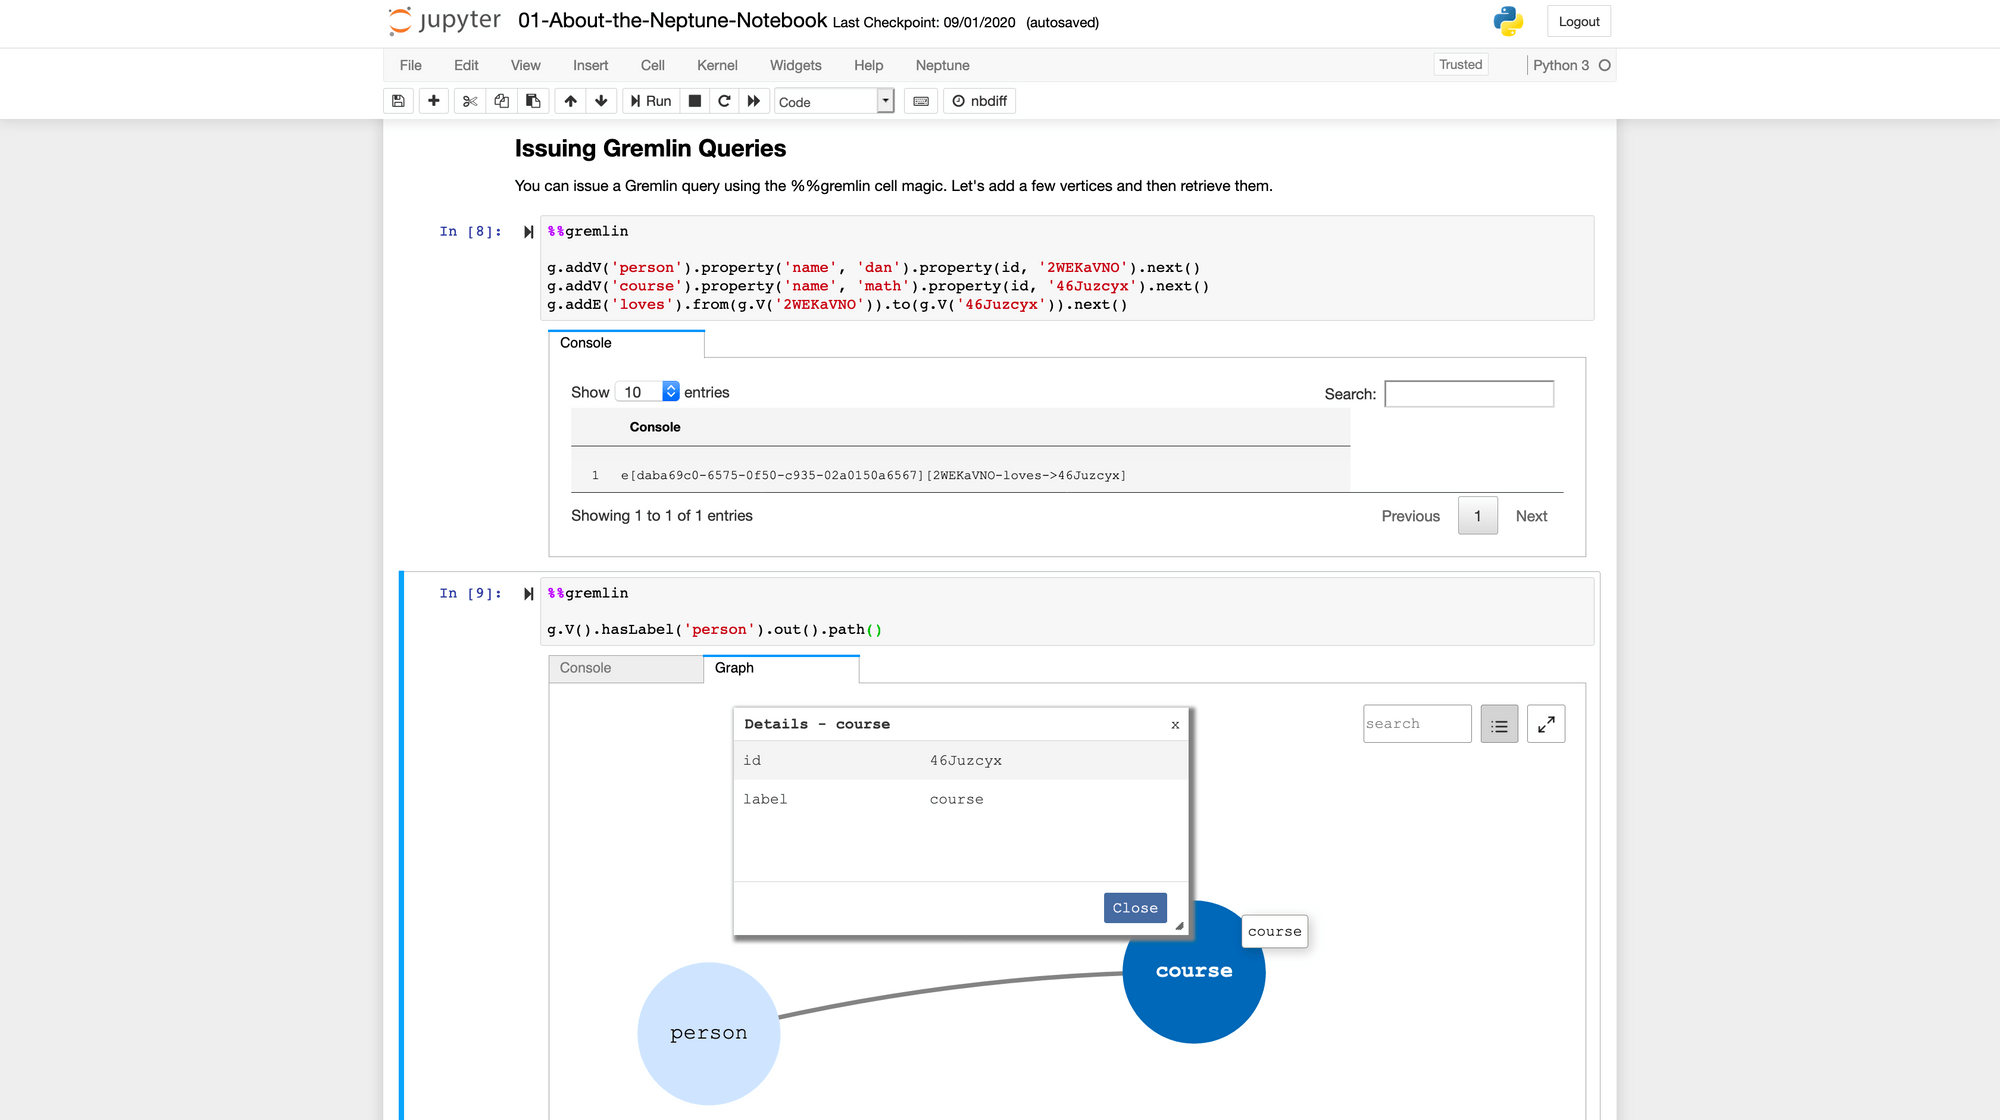
Recently, they also added a small graphical tool when you query on path , which could be helpful in representing some complex data in a different way, although this tool is quite new and limited at the moment.
The hard parts
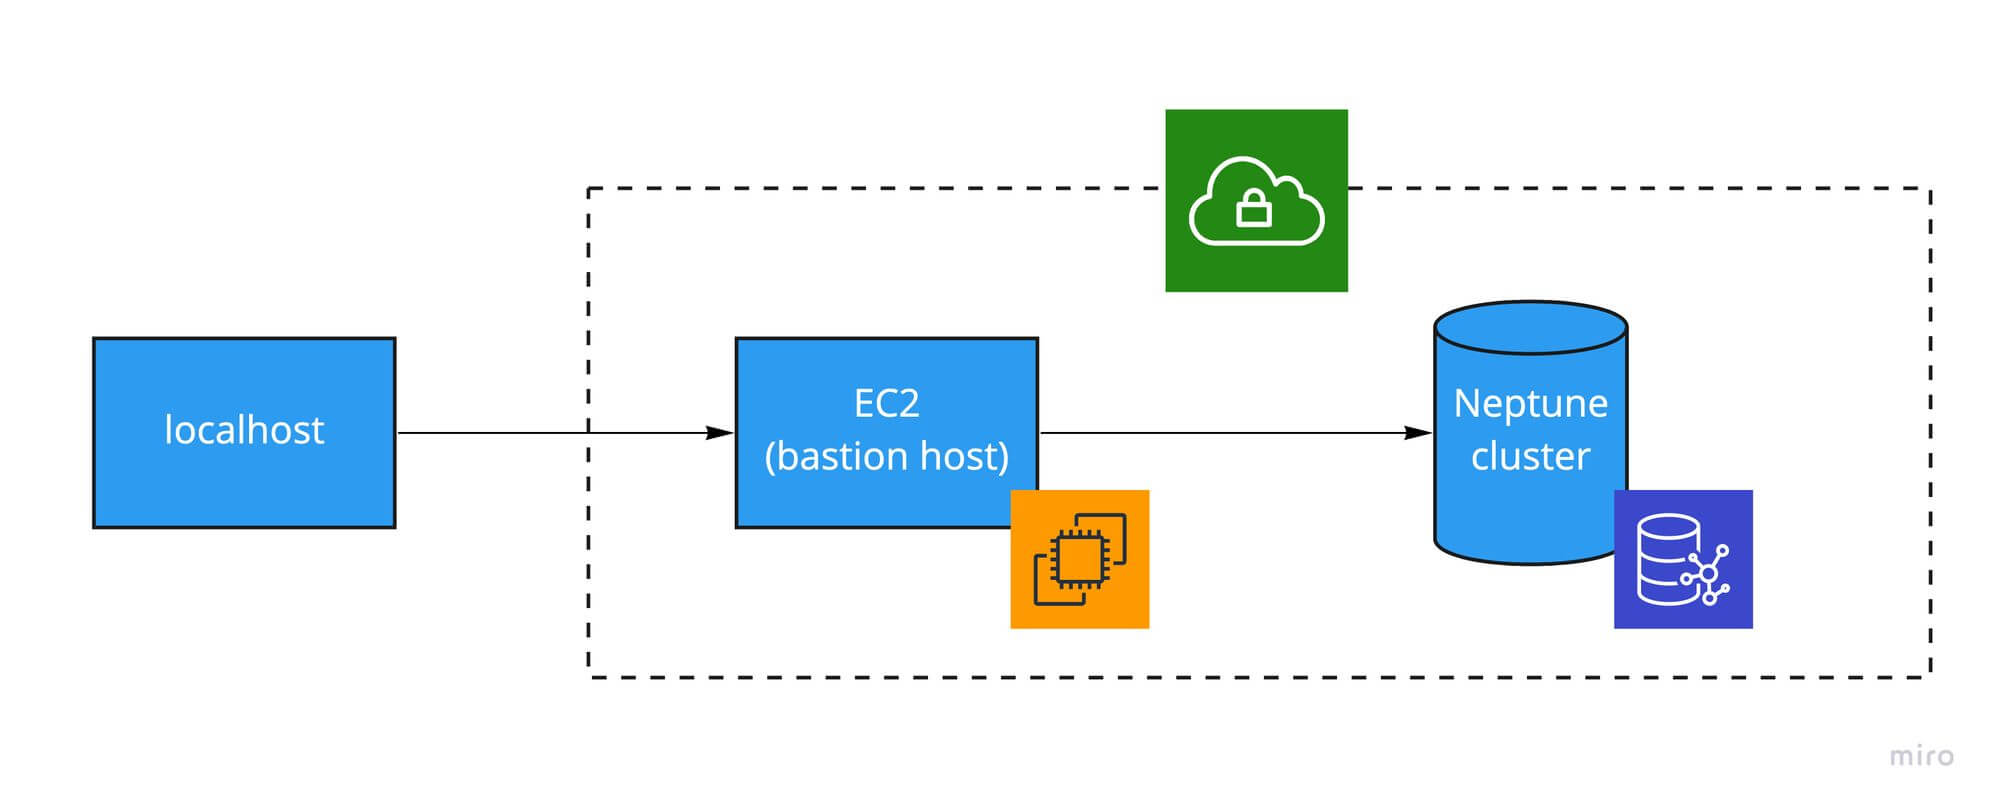
Even though everything is already running in the cloud. When developing, most people (I assume) would like to develop on their local system. Problem is, your Neptune database is running behind a mandatory AWS VPC which doesn’t allow you to connect directly to. To solve this, you’ll have 2 options: You’ll either have to setup a loadbalancer which will act as your gateway from your local system to your Neptune instance (which I won’t be covering here), or you setup an ec2 ‘bastion host’ inside the same VPC, which will have direct access to your Neptune instance, since it’s already in the same VPC. This bastion host will just relay all incoming requests for Neptune directly to the Neptune service itself. Below is a schematic representation of this solution.
Create a bastion host
Let’s start with the bastion host itself. Since it will only relay requests from your local system (and your teammates’ systems), it doesn’t need much compute power, so you can pick the smallest/cheapest instance there is. For example, you can pick a t2.nano instance with Amazon Linux. Just make sure you select the same VPC as the one you deployed your Neptune cluster in. Create or choose an existing key pair which you (and your teammates) will be using to connect from your local system to this bastion host, and make sure this key (pem file) is stored locally on your system.
Check your ec2-to-neptune connection
You’ll want to make sure your new ec2 instance can connect to the Neptune instance. To check this, first connect to your ec2 instance by running ssh -i <path-to-your-pem-key-file> ec2-user@<ec2-host> in your terminal. Once connected, run the following command on your ec2 instance: curl https://<cluster-endpoint-neptune>:8182/status. Just make sure it’s https you’re using, because since the latest Neptune engine updates, for some AWS regions, https in the only allowed protocol for REST api request (instead of http in the previous versions). You can find your cluster-endpoint-neptune on the Neptune dashboard page in the AWS Console.
If successful, the response should look something like this:
{
    "status": "healthy",
    "startTime": "Wed Jul 29 22:51:23 UTC 2020",
    "dbEngineVersion": "1.0.2.2.R4",
    "role": "writer",
    "gremlin": {
        "version": "tinkerpop-3.4.3"
    },
    "sparql": {
        "version": "sparql-1.1"
    },
    "labMode": {
        "ObjectIndex": "disabled",
        "ReadWriteConflictDetection": "enabled"
    }
}
Prime your local system
Now for the last step: configuring your local system for sending requests to Neptune via the bastion host.
If your working on a unix-based system, open your ~/.ssh/config file, and add the following piece of configuration to make your life easier
host neptune-demo
 ForwardAgent yes
 User ec2-user # when using Amazon Linux
 HostName <your-ec2-address>
 IdentitiesOnly yes
 IdentityFile ~/.ssh/<your-ec2-key-file>.pem
 LocalForward 8182 <cluster-endpoint-neptune>:8182
You’re not done yet. Open your /etc/hosts file and add the following line to it
127.0.0.1 <cluster-endpoint-neptune>
This last step is necessary so you’re able to use https when forwarding requests. Now, let’s start testing our localhost connection! Open a new terminal and run ssh neptune-demo -N. This will open your connection to the ec2 host, which will forward your requests to Neptune. This process will keep on running, until you kill it explicitly. Open another terminal and run curl https://<cluster-endpoint-neptune>:8182/status (or curl http://localhost:8182/status which works only for http). You should now receive the same output as when you run this call directly on the ec2 instance.
Starting local development
Now that you got an open connection from your local system to Neptune. Let’s put it to the test by writing a script querying the database. Below is a simple JavaScript snippet you can run locally, while your connection to the bastion host is open.
const gremlin = require("gremlin");
const DriverRemoteConnection = gremlin.driver.DriverRemoteConnection;
const traversal = gremlin.process.AnonymousTraversalSource.traversal;

// Pick one of the following
const dc = new DriverRemoteConnection(
  "wss://<cluster-endpoint-neptune>:8182/gremlin"
);
// const dc = new DriverRemoteConnection("ws://localhost:8182/gremlin");

const g = traversal().withRemote(dc);
const gProcess = gremlin.process;

const execute = async () => {
  const response = await g
    .V("2WEKaVNO")
    .outE()
    .inV()
    .has(gProcess.t.id, "46Juzcyx")
    .path()
    .by("name")
    .by(gProcess.statics.label())
    .next();

  console.log(response.value.objects);
};

execute().then(
  async () => {
    await dc.close();
    process.exit(0);
  },
  async () => {
    await dc.close();
    process.exit(1);
  }
);
Based on the graph added in the first section, the result returned should be
["dan", "loves", "math"];
Conclusion
It’s all a bit elaborate to setup, but once done, developing locally shouldn’t be a problem anymore. Take note that you can use the same procedure to connect a CI server to a Neptune instance. This can be handy if you’re running integration tests on a CI server.
Happy coding!
Last modified on 2020-10-04